Advanced Usage
Contents
Multiple Terminals
When you activate an environment by running genv activate in your terminal, a new environment gets created and registered.
Every activated terminal runs within an environment.
Genv supports running multiple terminals within the same environment.
This could be useful in many ways.
For example, when running an application in one terminal, and monitoring its GPU resources using nvidia-smi in another terminal.
If you have an activated terminal and you want to open another terminal in the same environment, you need to first query the environment identifier using the command:
echo $GENV_ENVIRONMENT_ID
Then, open another terminal and pass the argument --id to your genv activate command.
For example:
genv activate --id 1667
Your terminal should now be activated in the same environment.
You could verify it by running nvidia-smi and seeing information about the GPUs of your environment.
Genv automatically configures the terminal with the environment configuration and attaches the terminal to the devices that are attached to the environment.
Using sudo
In some cases, you will need to run genv commands as root using sudo.
For example, if you want to use enforcement capabilities.
The best way to do this is by installing using sudo and then using commands similar to the following:
sudo -E env PATH=$PATH genv ...
If you can’t install using sudo, check out the workaround described here.
Warning
Shell commands like genv activate should not be executed this way because they will not be able to manipulate the shell.
Explanation
Much of Genv functionality is based on environment variables. You can see this by running the following command from an activated environment:
env | grep GENV_
By default, when using sudo, environment variables are not preserved.
You can see this by running the same command from an activated environment:
sudo env | grep GENV_
This means that all that would not work when using sudo from an activated environment.
To fix this, pass -E or --preserve-env to the sudo command.
For example:
sudo -E env | grep GENV_
In addition to that, some Genv functionality is implemented as shims.
When applications such as nvidia-smi and docker are being executed inside an activated environment, their respective shims get called instead.
Genv modifies the environment variable PATH to do so.
You can see this by running the following command from an activated environment:
echo $PATH
When using sudo, the environment variable PATH is not preserved even when passing -E or --preserve-env.
You can see this by running the same command from an activated environment:
sudo -E bash -c 'echo "$PATH"'
This means that shims would not be executed.
To solve this, you can explicitly preserve PATH by passing env "PATH=$PATH" after the sudo command.
For example:
sudo -E env "PATH=$PATH" bash -c 'echo "$PATH"'
Alternatively, if you don’t want to preserve PATH, you can just wrap the executed program with which.
For example:
sudo -E $(which nvidia-smi)
Note
Make sure that you also pass -E to preserve all Genv environment variables
Install Without sudo
If you can’t install with sudo pip install, commands like the following will fail:
$ sudo -E env PATH=$PATH genv status
sudo: genv: command not found
As a workaround, you can set the environment variable PYTHONPATH with the path of the parent directory of the genv Python package installation directory.
For example:
sudo -E env PATH=$PATH PYTHONPATH=$(python -c "import genv, pathlib; print(pathlib.Path(genv.__file__).resolve().parents[1])") genv status
Running Containers
Note
This section talks about using docker commands from an active environment and the docker shim.
If you are interested in running containers as environments and not from environments, check out the Genv container runtime.
When running containers using a docker run command from an active environment, the docker shim is executed.
It is responsible for making the container accessible to devices attached to the environment, as well as propagating some of Genv environment variables.
Thanks to these environment variables, processes running in such containers are marked as part of the active environment.
This is necessary when running nvidia-smi in an active environment, as the nvidia-smi shim queries the environment variables of GPU consuming processes in order to identify the ones running in the same environment.
The problem is that containers can run as a different user than the shell they are executed in, and they typically run as root.
This means that permissions may be required in order to query processes running in containers, even when queried from the same shell that executed the container.
For example, when running nvidia-smi from a non-root shell in an active environment, it will not be able to identify processes running in containers from the same environment if they run as root.
There are two ways to handle this issue.
The easiest way is to run nvidia-smi with sufficient permissions using sudo:
sudo -E env PATH=$PATH nvidia-smi
The other option is to run the container as non-root.
You can do that by passing --user $(id -u):$(id -g) to the docker run command, or by editing the Dockerfile.
Over-subscription
Normally, the GPUs in the system are being provisioned to environments until they run out.
A GPU could be provisioned to a single environment, or can be shared between a few environments by configuring the environment memory capacity before attaching devices.
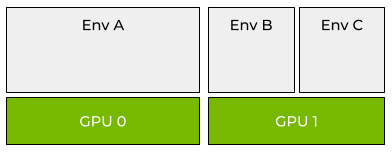
Full- and shared-GPU provisioning with Genv
However, this could be wasteful as the provisioned GPUs can be unused some of the time, and in some cases, this amount of time can be significant.
For example, when writing GPU-consuming code (e.g. deep-learning model with PyTorch) using an IDE like Visual Studio Code, or PyCharm, the GPU resources are not being used in all the time that is spent on coding rather than running the application.
For this use case and similar ones, it is recommended to over-subscribe 1 the GPU by provisioning it to more than a single environment without setting a memory capacity. Then, the entire GPU can be accessed by the different environments at different times, which will increase the resource utilization significantly.
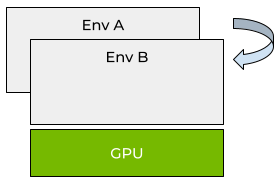
Over-provisioning with Genv
Attach with Over-subscription
By default, Genv does not over-subscribe GPUs. This means that once a GPU is fully provisioned - either to a single environment or multiple ones - it cannot be attached anymore.
Shell
When running environments in the shell, to attach a GPU with over-subscription you will need to pass the argument -o or --over-subscribe to the genv attach command.
For example:
genv attach --index 0 -o
Another example:
genv attach --count 2 --over-subscribe
Containers
When running containers using the Genv container toolkit, use the genv-docker flag --over-subscribe.
For example:
genv-docker run -it --rm --gpus 1 --gpu-memory 4g --over-subscribe ubuntu
If you don’t use genv-docker but rather use the Genv container runtime directly, you can set the environment variable GENV_ALLOW_OVER_SUBSCRIPTION to 1.
For more information check out the Genv container toolkit README.md.
Note
You should install Genv inside the container to use the access control mechanism.
Access Control
It is the responsibility of the users to access the over-subscribed GPU one at a time in order to avoid any OOM failures.
For this reason, Genv provides an access control mechanism, which can be used by the users to achieve the desired behavior.
Warning
All environments must cooperate and use the Genv access control mechanism. There will be no effect if only some of the environments will and you will be exposed to OOM failures.
Python SDK
Import the genv module and wrap your Python code with a call to genv.sdk.lock().
For example:
import genv

with genv.sdk.lock():
   main()
Note
For more information about the Python SDK see here.
Using Ray
Genv supports activating Ray tasks as Genv environments.
This can be useful for enforcing the resources used by the Genv workers.
For example, as described here, when using fractional GPUs with Ray, it is the user’s responsibility to make sure that the individual tasks don’t use more than their share of the GPU memory.
Using Genv’s Ray integration, you can use Genv enforcement capabilities to ensure that your Ray tasks do not use more GPU resources than provided by Ray.
Installation
Because your Ray tasks will run remotely, you should have Genv installed on the remote nodes. This could be done in several ways.
The preferable way is probably to install Genv using pip on remote nodes manually using the command:
pip install genv[ray]
If you prefer not to, you can use Ray’s runtime environments to install Genv in your remote Ray workers via Ray.
You can use the argument pip of ray.init.
For example:
ray.init(runtime_env={"pip": ["genv"]})
If this does not work for you, you can use the argument py_modules instead.
For example:
import genv

ray.init(runtime_env={"py_modules": [genv]})
Usage
To activate a Ray task as a Genv environment on the remote host, just replace the ray.remote decorator with genv.ray.remote.
For example:
@genv.ray.remote(num_gpus=0.5)
def foo():
   env_config = genv.sdk.configuration()
   env_devices = genv.sdk.attached()

   print(
      f"Running in Genv environment '{env_config.name}' which is attached to device(s) at index {','.join(map(str, env_devices))}"
   )